概要
nuttx/libxx の中に基本的なC++の機能を提供するためのライブラリは付属していますが,STLがカバーしている iostream や vector 等の機能を利用したプログラムは,そのままではコンパイルできません.
この記事では,軽量なSTL互換ライブラリであるuClibc++をSPRESENSEのNuttXに組み込み,C++の標準ライブラリを利用できるようにする方法を紹介します.
バージョン等
- SPRESENSE SDK v1.0.1
- NuttX: git(
33597a8)
uClibc++のクローンとインストール
NuttXのuClibc++をsdkと同じディレクトリにクローンします.
$ git clone https://bitbucket.org/nuttx/uclibc.git |
SPRESENSEのNuttXは本家NuttXの最新版とはディレクトリ構造が異なるため,install.sh を編集して対応させます.
- libs_path=${nuttx_path}/libs
+ libs_path=${nuttx_path}
実行してファイルをインストールします.
$ cd uclibc |
これによって,nuttx/include/uClibc++ の中にヘッダが,nuttx/libxx/uClibc++ の中にソースがコピーされます.
nuttx/Make.defs を編集して,uClibc++のヘッダのあるディレクトリをインクルードパスに追加します.
- ARCHXXINCLUDES = -I. -isystem $(TOPDIR)/include -isystem $(TOPDIR)/include/cxx
+ ARCHXXINCLUDES = -I. -isystem $(TOPDIR)/include -isystem $(TOPDIR)/include/cxx -isystem $(TOPDIR)/include/uClibc++
パッチを当てる
最近のコンパイラではそのままビルドできないため,パッチを当てます.
参考: [PATCH 2/2 uClibc++] Fix ARM EABI build failure in include/unwind-cxx.h
--- unwind-cxx.h.orig   2018-08-09 01:13:19.611199326 +0900
+++ unwind-cxx.h    2018-08-09 01:13:51.634592945 +0900
@@ -184,8 +184,9 @@

 // This is the exception class we report -- "GNUCC++\0".

-const _Unwind_Exception_Class __gxx_exception_class =
-  ((((((((_Unwind_Exception_Class) 'G'
+const _Unwind_Exception_Class __gxx_exception_class
+#ifndef __ARM_EABI_UNWINDER__
+  = ((((((((_Unwind_Exception_Class) 'G'
          << 8 | (_Unwind_Exception_Class) 'N')
         << 8 | (_Unwind_Exception_Class) 'U')
        << 8 | (_Unwind_Exception_Class) 'C')
@@ -193,6 +194,9 @@
      << 8 | (_Unwind_Exception_Class) '+')
     << 8 | (_Unwind_Exception_Class) '+')
    << 8 | (_Unwind_Exception_Class) '\0');
+#else
+  = "GNUCC++";
+#endif

 // GNU C++ personality routine, Version 0.
NuttXカーネルの設定と再ビルド
$ cd sdk |
矢印キーで選択,Enterで下の階層に入り,Escを2回押して上の階層に戻れます.スペースでチェックを付け外します.
- Library Routines
- sizeof(_Bool) is 8-bits のチェックを入れる
- Build uClibc++ のチェックを入れる
- Enable Exception Support のチェックを外す
- Have libsupc++ のチェックを外す
ビルドします.
$ make cleankernel |
うまく行かないときは config.py でデフォルトの設定を読ませてから再度 make menuconfig するとうまく行くかもしれません.
STLを使用したプログラムを書く
tools/mkappsdir.py と tools/mkcmd.py を使ってプロジェクトを作成します.
参考→ SPRESENSE SDKでArduinoを使わずにとりあえずLチカする
$ tools/mkappsdir.py cxxapps 'C++ Applications' |
テンプレートとしてコピーされるソースの拡張子を変更します.
$ cd ../cxxapps/test_stl |
Makefileを編集します.コンパイラのフラグも書いておきます.
- MAINSRC = test_stl_main.c
+ MAINSRC = test_stl_main.cxx
+ CXXFLAGS += -std=gnu++17外から見えている必要のある関数(ここではtest_stl_main)を extern "C" で囲みます.
#include <sdk/config.h>
#include <stdio.h>

extern "C"{

#ifdef CONFIG_BUILD_KERNEL
int main(int argc, FAR char *argv[])
#else
int test_stl_main(int argc, char *argv[])
#endif
{
  return 0;
}

}
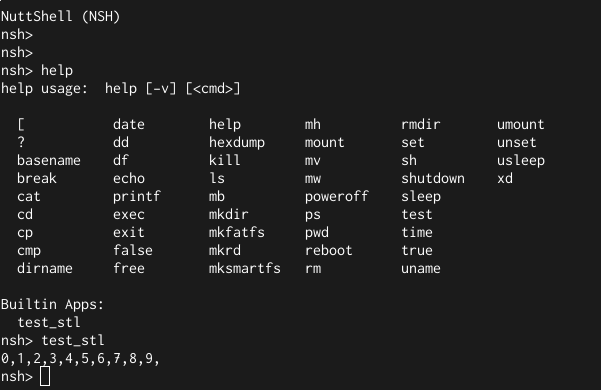
基本的にはこれだけしていればおkです. あとはプログラムを書いていきます. 以下の例は,vectorに入れて出すだけの無意味なプログラムです.
#include <sdk/config.h>
#include <iostream>
#include <vector>

using namespace std;

extern "C"{

#ifdef CONFIG_BUILD_KERNEL
int main(int argc, FAR char *argv[])
#else
int test_stl_main(int argc, char *argv[])
#endif
{
    vector<int> v;
    for(int i=0; i<10; i++){
        v.push_back(i);
    }

    for(auto x : v){
        cout<<x<<",";
    }
    cout<<endl;
    return 0;
}

}
ビルド
$ make menuconfig |
“C++ Applications” → “STL Test” にチェックを入れて終了します.
$ make |
できた
